

Create your own Candy Cane Elf with our easy tutorial! This elf can be cut with your Cricut Maker, Explore, or Joy! The finished elf is about 8 inches tall.
Christmas is my favorite time to craft, so that means it is time for another holiday craft.
I can’t get over how cute my candy cane elf turned out.
He would make such a great gift for kids, coworkers, teachers, neighbors, delivery drivers, and really anyone you want to gift a small handmade item to.

More Cricut Christmas Crafts:
The Cricut is my very favorite crafting tool, and Christmas is my very favorite holiday. That means I have lots of Cricut Christmas crafts to share with you! Like these Santa Boxes, this Ugly Christmas Sweater Shirt, and this Merry Christmas Gift Card Holder.
Be sure to look around the blog for more Cricut craft tutorial ideas!
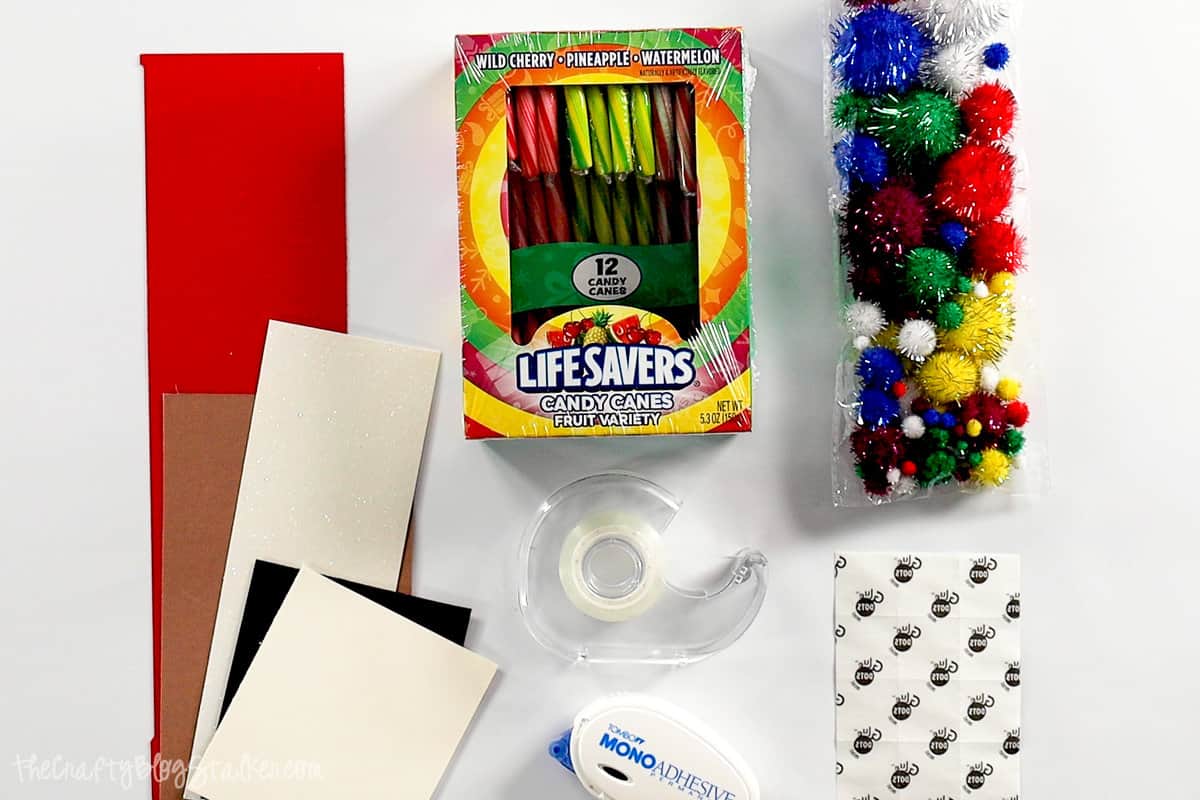
Supplies You’ll Need to Create this Project:
This post contains affiliate links.
- Cricut Maker, Explore, or Joy
- Elf Project Canvas in Cricut Design Space
- Candy Canes
- Cardstock – flesh, red, white, brown, and black
- Tape
- Glue Dots
- Double-Sided Adhesive
- Glitter Pom-Poms (optional)
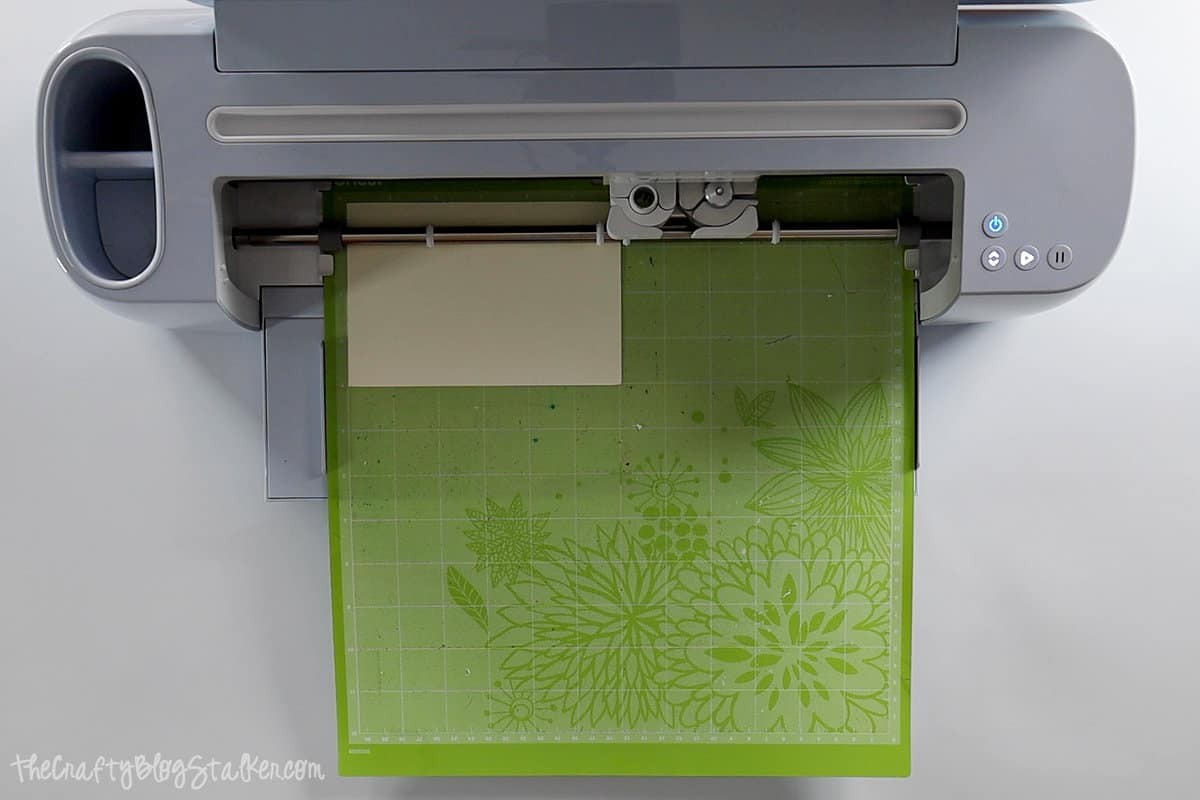
Cut the File in Cricut Design Space:
The file to make this gift card holder is completely ready to go! Simply click here and you will be taken to Cricut Design Space.
I have the file sized to fit a standard-size candy cane.
The finished size of the elf is about 8 x 4 inches.
If this size works for you then you can click on Make It.
If you need to adjust the sizing, click on customize.

There are 5 different colors of cardstock, so there will be 5 different mats to cut out.
Follow the prompts in Cricut Design Space to know which col9or to load next.
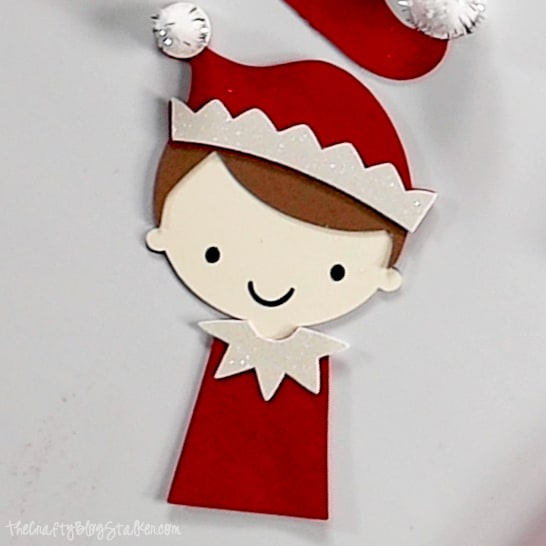
Layering the Elf Pieces:
Here are all of the pieces cut out.
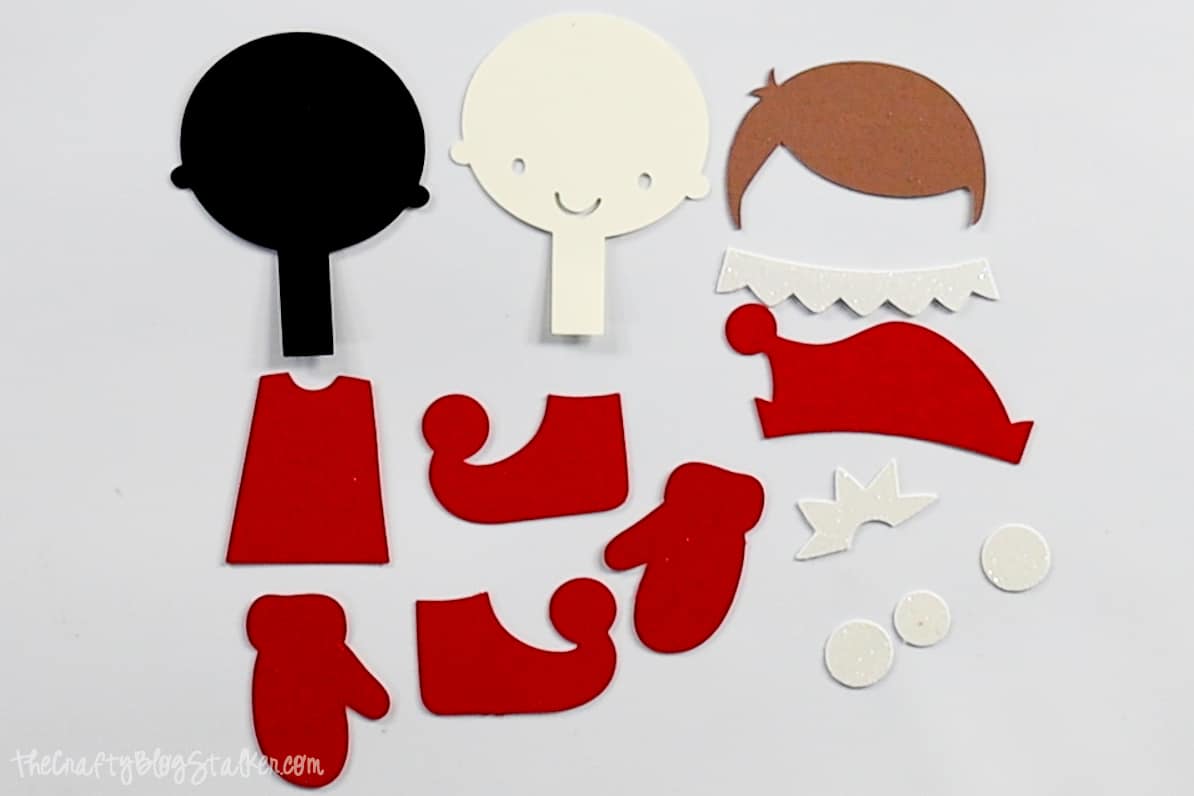
To layer all of these pieces we are going to use double-sided adhesive.
Begin by layering the elf head with the black behind the flesh-colored piece.
Align the hair using the ears as a guide. You want the hair to meet at each ear.
Next comes the hat, make sure it is covering the back of the hair.
Attach the trim and the white circle for the ball of the hat.
Adhere the white balls to the shoes.
Then use a glue dot to attach the pom-poms to the two shoes and hat.
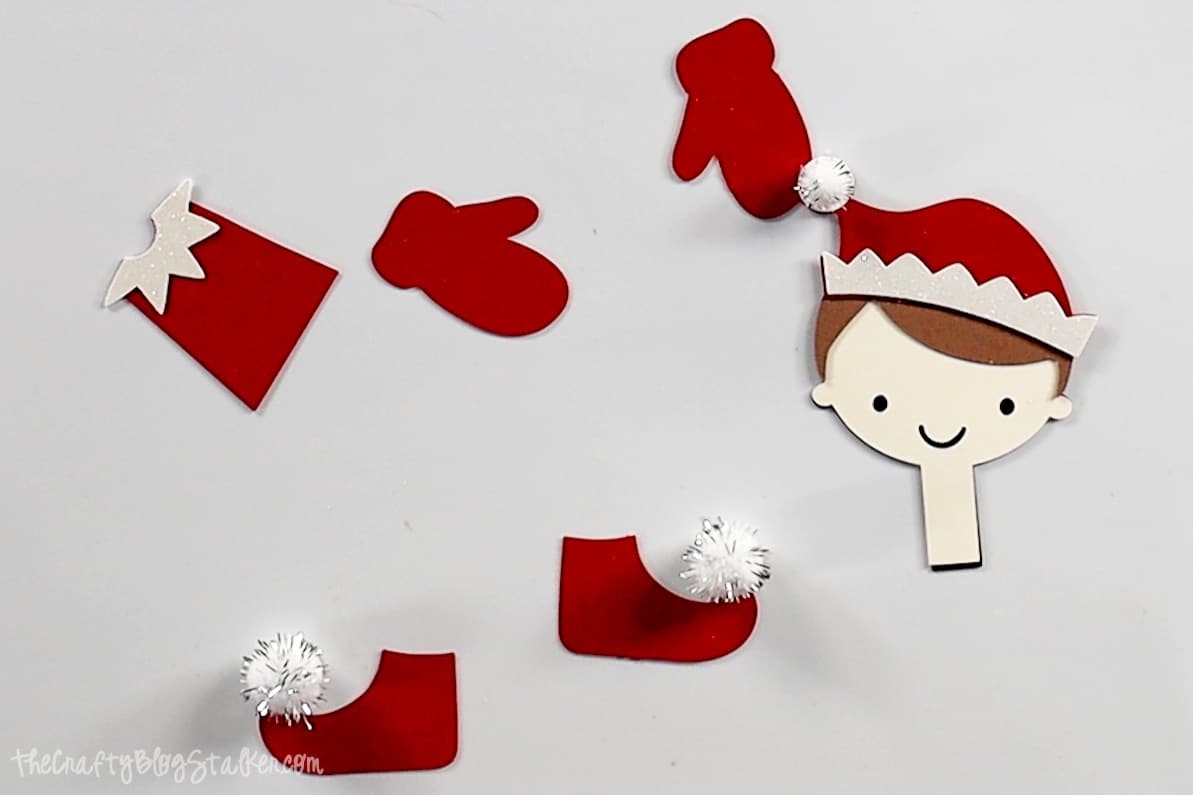
Attach the head of the elf to his shirt.
Assembling the Candy Cane Elf:
Take two candy canes and put them back to back.
The candy canes are going to become the arms and legs of our elf, so spread the “feet” apart just a little.
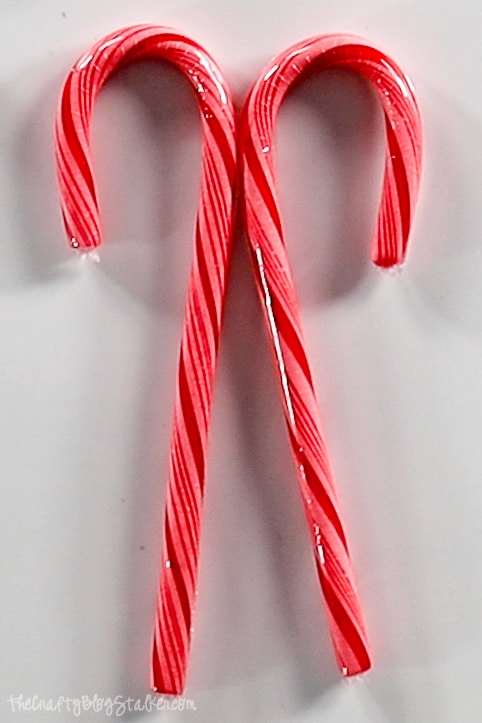
Wrap a piece of tape around the two candy canes where they are touching.
Place a glue dot or two on top of the tape, and play the top half of the elf on the candy cane. You want it to look like the hooks are coming out at the shoulder for the arms of the elf.

Attach the shoes by placing a glue dot on the heel of the shoe and sticking it to the bottom of each candy cane.
Then stick the mittens in place also using a glue dot.
Make sure the shoes and mittens are facing the right direction. The shoes should face out, and both thumbs of the mittens should face in.
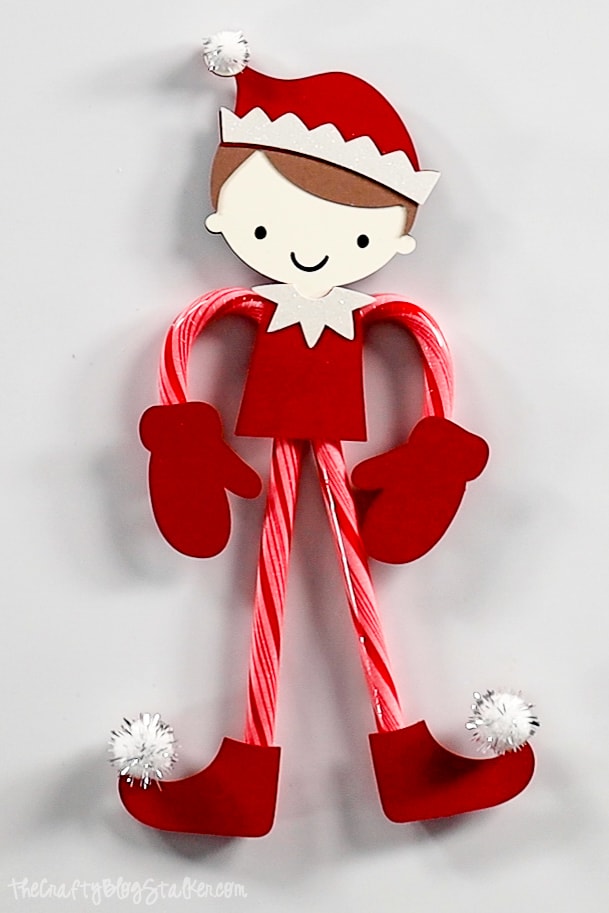
Isn’t our Christmas Elf so cute?
Craft Tutorial Video:
Like videos? I have a video tutorial for you! Please subscribe to my YouTube Channel so you don’t miss out on any future video tutorials!
Our Crafting Essentials List:
- The Cricut Cutting Machine is easily our favorite crafting tool. We use it in so many of our tutorials!
- This Fiskars Paper Trimmer is easy to use and cuts nicely without frayed edges.
- These Scotch Precision Scissors cut like a dream and you get multiple pairs in a pack!
- Keep those started project supplies organized and separated with Stacking Plastic Baskets. I always work on more than 1 project at a time and these baskets really help me from losing supplies.
If you love this tutorial, please give it a five-star review and help me share it on Facebook and Pinterest!
How To Make A Candy Cane Elf with a Cricut
Create your own Candy Cane Elf with our easy tutorial! This elf can be cut with your Cricut Maker, Explore, or Joy! The finished elf is about 8 inches tall.
Tools
Instructions
Cut the File in Cricut Design Space:
- The file to make this gift card holder is completely ready to go! Simply click here and you will be taken to Cricut Design Space.
- The file is sized to fit a standard-size candy cane.
- The finished size of the elf is about 8 x 4 inches.
- If this size works for you then you can click on Make It.
- If you need to adjust the sizing, click on customize.
- There are 5 different colors of cardstock, so there will be 5 different mats to cut out.
- Follow the prompts in Cricut Design Space to know which col9or to load next.
Layering the Elf Pieces:
- To layer all of these pieces we are going to use double-sided adhesive.
- Begin by layering the elf head with the black behind the flesh-colored piece.
- Align the hair using the ears as a guide. You want the hair to meet at each ear.
- Next comes the hat, make sure it is covering the back of the hair.
- Attach the trim and the white circle for the ball of the hat.
- Adhere the white balls to the shoes.
- Then use a glue dot to attach the pom-poms to the two shoes and hat.
- Attach the head of the elf to his shirt.
Assembling the Candy Cane Elf:
- Take two candy canes and put them back to back.
- The candy canes are going to become the arms and legs of our elf, so spread the "feet" apart just a little.
- Wrap a piece of tape around the two candy canes where they are touching.
- Place a glue dot or two on top of the tape, and play the top half of the elf on the candy cane. You want it to look like the hooks are coming out at the shoulder for the arms of the elf.
- Attach the shoes by placing a glue dot on the heel of the shoe and sticking it to the bottom of each candy cane.
- Then stick the mittens in place also using a glue dot.
- Make sure the shoes and mittens are facing the right direction. The shoes should face out, and both thumbs of the mittens should face in.
Notes
If you love this tutorial, please give it a five-star review and help me share it on Facebook and Pinterest!


Follow The Crafty Blog Stalker

The post How To Make A Candy Cane Elf with a Cricut – Video Tutorial appeared first on The Crafty Blog Stalker.