

Planning a trip to Disneyland? Make everyone their own autograph book with printable kid activities. Below is the complete tutorial.
Do you have a Disney vacation coming up? We are leaving for our California vacation in just 2 days!! We are all so excited and can’t wait for all of the adventures that are ahead.
More Printable Activity Sheets:
Printable activity sheets are a great way to keep kids busy and we have many free printables we’d love to share with you! Like Pete’s Dragon Activity Sheets, Disney Descendants Activity Sheets, and Beauty and The Beast Coloring Sheets!
Be sure to look around the blog for more fun printable craft tutorials!
Supplies You’ll Need to Create this Project:
This post contains affiliate links.
- Printable Activity Sheets
- Disney Stickers
- Cricut Cutting Machine
- Colored Cardstock
- Patterned Paper
- Chipboard
- Double-Sided Adhesive
- Cinch Binder
- Wire Cinch
Handmade Autograph Book:
Begin by cutting several different colors of 8.5 x 11 cardstock, into quarters. This will leave you with pages that measure 4.25 x 5.5 inches. I added about 15 of these pages in each book so there would be plenty of pages for autographs. But you could do more or less.
For the printables, I searched the internet for free printables with themes of where we were going. At the time, printables weren’t as popular as they are now, so I actually had a hard time finding them. But now we have lots of printables available to print and many are even Disney themed which would be perfect for this type of autograph book!
When printing, make sure to size them down so they will fit the 4.25 x 5.5 size books.

To create the front and back cover, cut 2 pieces of chipboard that measure 4.5 x 5.75 inches. Cover both sides with some patterned paper and double-sided tape.
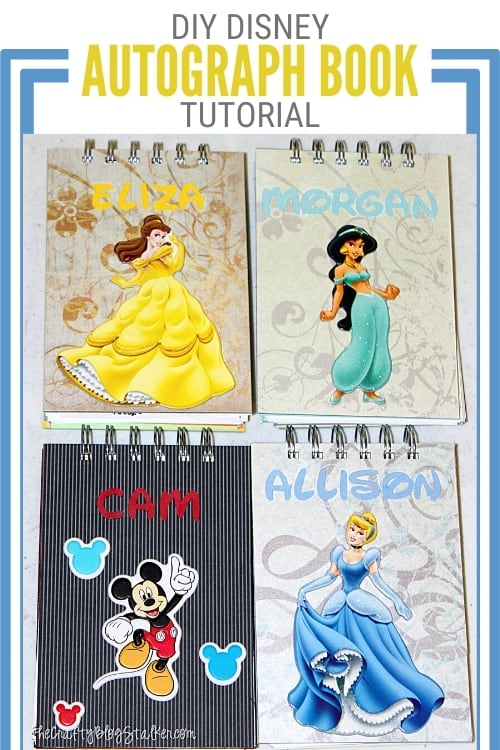
For the front cover, cut their name out of cardstock using your Cricut, and apply some fun stickers. Each of the covers for my kid’s books is personalized with their favorite Disney character.

To bind the books use the Cinch tool and some binding wire.
The books came together pretty quickly and I am so excited to give them to my kids. They will be a fun keepsake to remind them of this family trip.
But, I couldn’t let the kids have all of fun! I made one for me too.

If you love this tutorial, please give it a five-star review and help me share it on Facebook and Pinterest!
Our Crafting Essentials List:
- The Cricut Cutting Machine is easily our favorite crafting tool. We use it in so many of our tutorials!
- This Fiskars Paper Trimmer is easy to use and cuts nicely without frayed edges.
- These Scotch Precision Scissors cut like a dream and you get multiple pairs in a pack!
- Keep those started project supplies organized and separated with Stacking Plastic Baskets. I always work on more than 1 project at a time and these baskets really help me from losing supplies.

How to Make a Disney Autograph Book with Kid Activities
Planning a trip to Disneyland? Make everyone their own autograph book with printable kid activities.
Materials
Instructions
- Begin by cutting several different colors of 8.5 x 11 cardstock, into quarters. This will leave you with pages that measure 4.25 x 5.5 inches. I added about 15 of these pages in each book so there would be plenty of pages for autographs. But you could do more or less.
- For the printables, I searched the internet for free printables with themes of where we were going. At the time, printables weren't as popular as they are now, so I actually had a hard time finding them. But now we have lots of printables available to print and many are even Disney themed which would be perfect for this type of autograph book!
- When printing, make sure to size them down so they will fit the 4.25 x 5.5 size books.
- To create the front and back cover, cut 2 pieces of chipboard that measure 4.5 x 5.75 inches. Cover both sides with some patterned paper and double-sided tape.
- For the front cover, cut their name out of cardstock using your Cricut, and apply some fun stickers. Each of the covers for my kid's books is personalized with their favorite Disney character.
- To bind the books use the Cinch tool and some binding wire.
- The books came together pretty quickly and I am so excited to give them to my kids. They will be a fun keepsake to remind them of this family trip.
Notes
If you love this tutorial, please give it a five-star review and help me share it on Facebook and Pinterest!


Follow The Crafty Blog Stalker


The post How to Make a Disney Autograph Book with Kid Activities appeared first on The Crafty Blog Stalker.